Saturday, November 19, 2011

Root Crops and Hardy Greens

Today I finished harvesting the rest of my carrots.  All that was left were the purple carrots from my box and they turned out to be the best carrots I have harvested this fall.  They were all a nice large size; there wasn’t any insect damage or cracks.  Next year I am planning on growing most if not all of my carrots at home in boxes.

I have harvested a few parsnips so far and they have been huge.  I am digging them as we eat them and probably will continue to do it that way.  There aren’t tons and that’s where they will be the safest.  There are some mice in the basement that have nibbles on a potato or 2 and I see no reason to give them anything else to eat.  The cats do make sure they only appear every so often but still.

Something I also learned after the 5 inches of snow we got yesterday is that bok choy and kale are both winter hardy.  The kale looks perfect and is going to be coming out of the garden next week.   The bok choy went to seed a couple weeks ago and I have been using some of the leaves, but pulled the remaining plants today.  There are a couple that I brought inside to use this week but the rest are compost.

Mulching Garlic and Asparagus

Last week on Nov 12th, I finally finished the garlic bed for the year and mulched it.  I used the mulched leaves that I gathered a couple weeks ago from the cottage.  They were a mixture of maple ash and poplar leaves.   I spread the leaves loosely over the garlic at approximately 2-4 inches deep.  I used shredded leaves so that when the garlic sprouts it will be able to push through them.  If the leaves were whole the garlic would have more trouble pushing through them. 

I also dug up around one clove that I planted a month ago to see how it was doing.  Although it didn’t have a sprout on top of the clove, it did have roots!  Now I didn’t dig up the whole clove just the side of it so I could see it and then rebury. 

I also mulched the asparagus.  For this I used whole leaves and spread it around 4 inches deep.  I spread it thickly all around the plants with a little right on top.  I'm not as worried that the asparagus will have trouble coming up through the leaves.  It is a pretty hardy plant.

Sunday, October 30, 2011

Final Field Harvest

Today I finished harvesting the rest of the vegetables from the field.  All that was left was carrots and potatoes.  I ended up with a full 5 gallon bucket of potatoes and about a half bucket of carrots.  They were all small to medium sized; there were a few large carrots and potatoes.   

I didn’t track how well the varieties grew because of the growing conditions.  The heavy clay soil and the occasional flooding of the field weren’t beneficial to the root vegetables.

I finished mulching the asparagus with the rest of the leaves.  I am really hoping that it is not too wet because if all of that asparagus dies I'm going to be pretty disappointed.  It is planted on slightly raised ground but I'm just not sure, when that field gets wet all of it gets wet.

The 15 bulbs of music that were bought before I found all of the other varieties were finally planted.  I used my ridging hoe to combine 2 former rows of potatoes into one big row to plant the garlic.  I wanted to make sure that the garlic doesn’t sit in water all winter.  Before I planted the garlic I soaked it for 24 hours in water and baking soda to kill off any parasites it might have.  When I planted because the ground was just a wet muddy mess I just pushed the cloves in and packed a little mud on top.  The garlic was also given a 2” layer of leaves.  Hopefully everything at the field works out.

Planting Fall Asparagus

Yesterday I planted all of the asparagus crowns I started from seed this spring.  My garden already has a ton of asparagus so these seeds were planned for my grandma’s and the field garden.   They are the Viking variety which i currently grow in my garden.
The seeds were all planted in containers with 11-15 seeds per container.  The germination rate was terrific; I think I only had 3 seeds not germinate.  These are the pots before I separated the crowns. 

The crowns were intermingled so when I separated them I broke them apart from the bottom and then shook the entire bunch to shake off the dirt and loosen them all up.  I didn’t separate the crowns until I was ready to put them in the ground. 


At my grandparents I planted a 5’x7’ plot.  This is a picture of the area after I dug it up and then dug these 4 trenches. 

At the bottom of each trench I spread a 5 gallon bucket of well composted horse manure.
The crowns were all spaced out and slightly covered up before I fully covered them up.   The plants were placed approximately 12”x18” apart.  For regular spacing this is much too close together but I didn’t want to have to dig up a bunch of their yard.  This also means there will be enough even if I lose a couple to the winter.

After they were all planted and the soil leveled I put a couple more buckets of manure on top of everything and then mulched with a couple inches of leaves.

The asparagus that was planted at the field didn’t get the same quality treatment.  Because the field is such heavy clay and we have had rain for the last 2 weeks it’s a nice heavy muddy soil.  That asparagus was planted in the former potato rows that I dug up yesterday as well.  This will be elaborated on later.  The rows were planted 18”x 28” apart.  I used my hoe to dig a very shallow trench down the middle of each row.  I planted the crowns and packed them with some nice sticky mud.  I then covered each row with a couple inches of leaves.  There is still one row that I have to finish today.  Over all I have about 100’ of asparagus planted at the field.

Sunday, October 23, 2011

Garden Clean Up and Final Garlic Planting

Today has been the first nice sunny day in 2 weeks.  I took full advantage and continued on with the garden clean up.  I pulled out all of the tomatoes and the beans. The pole beans were fully intertwined in the trellising mesh I used and I was unable to separate the vines from it.  I have decided to throw the entire thing out unfortunately.  It is possible to separate them but it would take a few hours for a 10”x10” piece.

The remaining carrots from the bottom bed were dug up as well as one parsnip.  The carrots had some animal damage but there weren’t very many left.  The parsnip I dug was approximately 2lbs and huge.  This was my first time growing them and I would say even though I have only dug up one, success.

I also managed to finish planting my garlic!  I planted 2 rows of music and one row of McEwen's red.  The music I bought from the Hewitt’s maple syrup at the market and also used the 3 heads of music I grew myself this year.  The McEwen's red are from the bulbils I planted in the spring.  Some manage to form head with 6 cloves others just ended up forming one big clove.  The polish white was thinned out today to rows 4’ apart and plants 6’ apart.

Using some of the leaves I brought home yesterday I mulched the rhubarb and the polish white.  I used the full leaves for this and am saving the mulched leaves to mulch the newly planted garlic.  I am going to wait a bit before I mulch the rest of the garlic at least until the ground starts to freeze up a bit.  Just In case some mice or other creatures decide they want to make a home in it.

Saturday, October 22, 2011

Potato Harvest

Today I harvested all of the potatoes at home.  These were all the potatoes that I grew in straw.  In the bottom bed I had 12 plants of River john blue to uncover.  They were planted in a trench and covered with approximately 6 inches of straw. 

While the plants were growing they were not supported properly and the stalked all fell over.   The straw was very easy to take off and most of the potatoes were just sitting there waiting to be picked up.  

There were a number of potatoes that were mostly buried in the ground so after I picked all of the ones that I could see, I took the fork and dug where they had been planted.  Of all the potatoes from the row approximately 10% of them I found with the fork afterward.  There was a good mix of sizes with most being medium to large.

The black Macintosh was planted in these 2 boxes.  Between them I had 10 plants (6 and 4).  One box was planted with the potatoes in the soil with a little bit of straw and the other was planted on the soil with approximately 8 inches of straw.  The 2 boxes even though they had a different number of plants both produced about the same.  The potatoes were small to medium sized, nothing very big. 

The banana fingerling potatoes that were harvested today were also planted in a box.  They were covered with approximately 4 inches of straw.  I was actually pleasantly surprised at how well they did.  After removing the straw I was able to pick up 60% of the potatoes without doing any digging.  And the remainder I just dug up with my hands because they were in the box in an uncompact soil.  Because these are fingerlings they are naturally small, and I had a wide variety of sizes with an overall decent quantity.


Overall I am very happy with the straw and box experiments.  The straw led to cleaner and easy to dig potatoes.  I would defiantly use straw again.  I might use boxes again.  The only drawback to the boxes is the size of your potatoes.  All of the potatoes I planted in boxes I also planted in the bottom garden bed in the traditional method.  Consistently across all 3 varieties the potatoes planted in the garden were larger than those in boxes.  The potatoes in the boxes were cleaner and do not appear to have any scab on them.
This morning I also spent 3 hours helping to rake leaves at the cottage.   I am planning on using these leaves for mulching purposes this fall and in the garden next year.  I brought home a full truck load (approx. 600lb) and there are probably 3-4 times as many more still there.  I will most likely get a few more this fall and then get the rest next summer.

Wednesday, October 12, 2011

Planting Garlic


Yesterday I planted the first of my garlic for next year!  I planted the brown Saxon, Georgian fire, northern Quebec and red Russian. I actually ended up having 23 cloves of each variety.  I planted them each in a single row with the rows 8” apart and the cloves 6” apart.  The rows have all been marked and I also have a plan on paper should the row labels get destroyed (they are laminated and hockey taped on so I feel pretty safe).   I have taken pictures of each of the varieties in the bulb and clove form to document them for future reference.

This garlic was just broken apart into clove form and planted, there wasn’t anything done to it.  I still have the music and McEwen’s red to plant, I wasn’t properly prepared yesterday and ran out of time.  And today it is raining so on the next decent day I will plant the final few rows.  With the music garlic for half of them I am going to peel the cloves and soak them in a mixture of water and baking soda to help destroy any diseases. 

The polish white I am going to leave where it is and just thin out the plants.  They are currently only and inch apart so will probably thin 4 out of every 5.

I recently received “the complete book of garlic” for my birthday and will be reading that in-depth to learn everything I can.

Thursday, October 6, 2011

Peppers and Leeks

Yesterday I picked all of the peppers out of the garden and pulled out all of the plants.  We have started getting frost and it was time for the peppers to come out.  It also happens to be the location of next year’s garlic which I am going to be planting next week.  Below is a picture of the plants before I pulled them all out.
This is the basket of peppers I got and the plants after I tore them out.
I also harvested my first leeks!!  They are a good size and for the first time growing them I am pretty happy with the way they turned out.  I also tried them out and they were pretty tasty.  They might have been planted a little close together and could have used more hilling, but not bad overall.

Tuesday, October 4, 2011

Apple Jelly

I didn't realize how long it has been since my last post. There should be more in the coming weeks as the garden is closed down for the winter.

So I posted earlier that I had decided to try and make some apple jelly.  Well since that post I have made a number of batches and am very pleased with my results. I ended up making apple, apple cinnamon and apple cranberry.
First off you need apples.  I used a number of different varieties all that grow wild along the road I live on.  I used a couple varieties that were fully ripe and red so that the bright skin would impart its color to the jelly, and then a couple varieties that were partially ripe.  From what I have read the partially ripened apples contain more pectin than fully ripe apples.  Because I was worried that there still wouldn’t be enough pectin I threw in a handful of green crab apples as well just in case.  Crabapples contain more pectin than regular sweet apples.
I filled the sink with water and dumped the apples into it so that they would be clean.  They were then rough cut into 4-8 pieces so that they were all roughly uniform in size, in the process i cut the blossom end off on the apples and took the stem off as well.  This was to make sure there weren’t any little black things in the jelly.
The cut apples were placed into a saucepan until they were within 2 inches of the top.  I then filled the pot with water till it was approximately an inch below the apples.  If your apples are floating then you have added too much water.  It is also important not to fill the pot too full, because when it boils over it is a pain to clean off of the stove. (If you want it to be apple cinnamon jelly add a couple cinnamon sticks to get the flavor as it boils, and if you want apple cranberry add cranberries as a 1:3 ratio to apples)

Boil the apples for approximately 30 minutes.  I boiled on high for 10 minutes and then turned it down to medium low for another 20 minutes.  Also at the 10 minute mark take a potatoes masher and crush the softened apples.  You can also do this again at the 20 minute mark.  Crushing the apples allows all of the juices to blend together and get the most out of the apples as possible.  You will end up with a pot full of mushed apples, skins and seeds that smells good but doesn’t look appetizing at all.  This is exactly what you want.
You are now going to strain the jelly.  Line a large bowl with a triple layer of cheesecloth.  Make sure there is enough cloth that it hangs over the sides, because after the jelly goes into it you are going to need to tie the 4 corners together.  After the cloth is in place you can pour the cooked apples and all the liquid in the bowl.   Tie the four corners up so that the cheesecloth can be picked up with all the contents staying inside it.  My batches of jelly ended up being quite large so I ended up using a cereal box on either side of the bowl, with a wooden stick sitting on top of them for the cloth to hang from.
As the cheese cloth hangs all of the juice will drip out of it and into the bowl.  It should be left for approximately 4-5 hours or you can leave it overnight.
When you have that nice big bowl of delicious juice you are ready to make jelly.  If you don’t have time right them you can leave the juice in the fridge for a day or two and then make the jelly.
I ended up making 3 kinds of jelly and 1 kind of syrup.  For the jelly use ¾ cup sugar for every cup of juice.  For the syrup use ½ cup of sugar for every cup of juice.  One of my syrup batches actually became jelly so if you want to use less sugar you can.
In a large pot mix the juice with the sugar and whisk it all together.  Turn the burner on high and let the liquid start to boil.  Don’t stir the juice and keep it as hot as possible.  It should take approximately 25 minutes until it is ready.  Using a thermometer check the temperature, you want it to be at 218-220C.  You can also check it by dipping a spoon in to the liquid jelly and when you let it fall off the spoon it should sheet off the spoon instead of drip.  And the third way is to put a few drops on a frozen plate and let it sit for about 15 seconds.  When you push your finger through it, it should wrinkle up; and that lets you know the jelly is done.
When you start to boil the jelly, you also need to put a large stock pot full of water on to boil as well.  This will be used to make sure the jelly seals properly.
You can use any size jar that you want but I recommend 125ml and 250ml jars.  Your jars need to have been washed and sterilized, wash them in warm soapy water to make sure there is nothing in them.  Remember when canning you need to always use new lids so that they seal properly, but the sealing rings and jars can be reused.
I then filled my jars using a glass mug to scoop and pour the jelly.  Fill the jars so that there is only ¼ head space between the jelly and the top of the jar.  Wipe off any jelly that's on the outside of the jar and then add the lid and sealing ring.  Make sure you tighten the ring up and then set the jar aside.  When all of your jars have been filled and sealed place then in the stock pot of boiling water for 5-10 minutes.  This ensures that the jar seals properly and makes your jelly safe to eat in the coming months.
After removing the jelly from the water set it on the counter to cool down.  As it cools you should hear popping as the lids all pop down.  If the lid pops down that's great it means you are safe to store it until you are ready to eat it.  If it doesn’t pop that means it didn’t seal properly and can’t be stored.  It would end up most likely growing mold and you risk botulism.  You can re boil the jelly and then reseal it or I recommend just eating that jar first.   I didn’t encounter this problem with any of my jars and if you do everything properly it usually isn’t a problem.
All that's left is to label your jars and put them somewhere safe until you are ready to enjoy them.

Wednesday, September 14, 2011

Peppers and more Garlic

Today I finally harvested the McEwen’s Red garlic from the garden.   This is the garlic that I planted from bulbils in the spring along with Polish White.  In the spring when I planted the bulbils I read that in the first year they should form a single clove.  In the second year if you plant that single clove it should fully form into a full head of garlic.  This is a picture of the 13 heads of garlic that I harvested. 

Of the 13 heads of garlic only 3-4 have a single clove the rest have multiple cloves around 6-10 per head.  Some of these heads actually are the same size as the garlic that I grew from cloves!


The polish white still needs to be harvested but while I was digging up the others I noticed that the polish white is just sending up scapes now.  I took the few scapes that had formed and will give it another week to die off a little more.  They are going to be pretty green but I guess we will see what they are like.   Eat the small ones and save a few of the big ones for replanting at thanksgiving.  Those are the scapes in the picture below.


The peppers have done very well this year and below are a picture of the Hungarian banana peppers.  They are smaller than the ones I have been getting at the market but we are also a couple hours farther north than the ones I have been getting.

Sunday, September 11, 2011

Apple Jelly and Potatoes

I’ve been interested in making some crab apple jelly and this week I finally managed to try it out.  It turned out to be just apple jelly because the crab apples along the road aren’t ready yet.  I used 3 different kinds of apples all that I picked along the road where I live.  They were a mixture of ripe and semi ripe apples in order to provide the necessary pectin content.  I was worried it wouldn’t turn out and just end up being this apple syrup, but it was successful.   Because it worked out, yesterday I picked some more apples and today I have been making more.   I will put up a post solely dedicated to jelly later.

Also today I harvested the first potatoes I planted in the spring.  I there were two hills of banana fingerling, two hills of Macintosh black and one hill of blue Russian.  The banana fingerling were larger than I expected and more prolific.  I was surprised but they did out produce the black mac’s. They did however grow very close to the surface and a number of them had green tips. 

 The Macintosh black were all of a decent size and number.   A few had some scab on them but overall not too bad.  The blue Russian were very successful, there was a good mix of large and small potatoes.  There was actually more potatoes from that one hill than, both hills of the black combined.  As well they also had less scab than the blacks.  

These are the russian blues

I also took a picture of the tomato fruit.

Thursday, September 8, 2011

Feels Like Fall

I know it’s not fall yet, but this last week it sure has felt like it.  Nothing has changed in the garden too much, I am still picking cheery tomatoes every few days and there are lots of beans that need to be picked as well.  The same goes for the zucchini and cucumbers; they have hit their second wind and still producing well.  The plants are dying off a bit but I expect them to last a couple more weeks and then they are being pulled out anyways.  This past week a few red peppers have been picked and a number of them are starting to turn from yellow to orange to red. 
The root vegetables have been doing well, the carrots at the bottom are being picked regularly although some of them have been eaten by small little worms.  I think its carrot fly but at least they only infected some and not all.  I hope they have not gotten into the parsnips but I will have to wait and see.
 The potatoes at both my place and the field have done very well; the ones at the field due to the clay soil are all a nice mini size.  The ones at my place are starting to break through the soil in places and the plants are starting to die off.  The potatoes in the bottom garden did get hit pretty hard my potatoes bugs but by the time they showed up the plants had already flowered and had midsized formed tubers so I didn’t bother to powder them or anything.  I will be looking to harvest some of the potatoes on a regular basis for the next month for eating and then the remainder in mid-October when the plants die down.
The leeks look good and im just trying to think of what I can use them in.  The kale and bok choy that were planted a few weeks ago are looking ok.  They do have some bug damage but nothing too major. 
The garlic that is still in the garden is coming out of the ground this weekend.  About ¾ of the plants have at least 1 dead leaf and while they are all still very green I don’t want to leave them in the ground any longer especially since I want to replant them in October. 
The cover crop experiment has been a success!  The buckwheat is around a foot high and starting to flower.  I might give it another week and cut it down before it all goes to seed.  I am debating on planting some more in the top bed where the peas were.  That area is also getting more soil and a dressing of manure so I am not sure if it will even be worth planting any.

Monday, August 29, 2011

More Garlic Info

As I was online trying to find out more about the bulbs I bought this year I found another garlic site.  These were the descriptions I found for the ones I was unsure of:
Brown Saxon (Rocambole) - This is a unique Rocambole with large brown cloves; harvests late.  Double cloves are rare.  A strong character and great storing qualities.  Averages 7 cloves per bulb.
Russian Red  (Rocambole hardneck variety) - This is another variety that has done very well for us.  It has a strong garlic flavor and has a warm sweet aftertaste.  It is a NW heirloom brought to British Columbia by Doukhobor immigrants from Russia in early 1900's.  Averages about 4 cloves per bulb.

Now I have seen Russian Red and Red Russian, depending on the site i have seen them listed as a Porcelian, Purple Stripe and Rocambole and I’m not entirely certain which one mine is.  I want it to be a Marbled Purple stripe but it couple be a Porcelain.  There are 6 cloves per head so that doesn't help too much. I am going to continue to read more about it to try to figure it out.  And if all else fails i will wait until it forms scapes and base my decision on the scape and resulting bulbils.


Gourmet Garlic Gardens
Wisconsin Garlic

Sunday, August 28, 2011

Clean Up


Today was the beginning of my fall garden clean up.  I know that fall isn’t here quite yet, but the weather has been changing in the last couple weeks.  Today I pulled out the peas in the middle garden.  These were the plants that that had left peas on so that I could save them for seed.  This is a picture of the plants before I removed them.

 The peas that I picked off are all at various stages of drying.  Some pods are completely dry and black looking, and others are still green.  I am going to leave them in a flat all spread out to continue drying.  I have read that you can leave them in the pods until you need to plant them in the spring, so at lease I don’t have to worry about them being in the pod too long. 

After removing the peas I dismantled the trellis, and used my new garden tool to work up the ground.  Im not entirly certain what the name of the tool is, but it is amazing for breaking up the soil. This is where the garlic is going to be planted in about 6 weeks.  I will be adding more manure to the soil and am debating on planting some buckwheat as well.

Saturday, August 27, 2011

Weekend


So today when I was at the Farmer’s market I was able to get another variety of garlic, it is called Brown Saxon.  I took a picture with all the info on it and this is what it said “this is a unique Rocambole with large brown cloves; harvests late.  A strong character and great storing qualities”

This gives me 7 varieties now, polish white, McEwen’s red, music, red Russian, northern Quebec, Georgian fire and brown Saxon.  This is all that I am going to grow next year.  My original plan of buying from the Garlic Farm in B.C. has been abandoned.  When I found out that I was able to get some of the varieties I wanted locally I decided I would rather buy it locally and save myself some money even if I couldn’t get all of the varieties I wanted.


I was also talking to the guy that grows it.  He let me know that the Red Russian I bought a couple weeks ago is a purple stripe (wondering if it might be marbled purple stripe). I was also able to get planting and harvesting info.   He also said that he usually plants all of his garlic the week of Thanksgiving.  This year he cut the scapes off around Canada Day.  As well he mentioned that the Music and Red Russian are both very consistent garlic, cut the scapes off and then 2 weeks later they are ready to come out of the garden.  But the northern Quebec is a trickier garlic and you have to watch it more  because it is a later maturing variety and will be a couple weeks later.

Today I also went over the field to check out that garden.  I picked few cucumbers and there are a few left thereon the plants, but they are dying off.  There were tons of cherry tomatoes both red and yellow.  My cousin also wanted to dig up some potatoes.  Now because of the heavy clay soil none of the potatoes have gotten very big, they are all miniature potato size.  We dug up some river john blue, baby reds and one plant of banana fingerling.  The fingerlings only had like 2 potatoes on the whole plant.  Disappointed but not surprised.   There was also one potato plant that was planted in the leaf compost pile.  It was planted a week sooner than everything else but because of the extremely loose soil 2 of the 7 potatoes we got off it were the size of soft balls.  They looked terrific and I let my cousin have them.

Wednesday, August 24, 2011

Spring Planted Garlic

Yesterday I picked the 3 garlic cloves that I planted in the top bed.  I only planted 3 cloves of music that I had forgotten about in the cellar from last year.  The cloves that were planted were all different sizes.  The plant at the back had the largest clove and the ones in the front were smaller.  As I mentioned last week, I have been trying to decide when the best time to harvest garlic is.  In the picture below you can see that each plant is at a different stage of maturity, so I decided to pick all 3 so that I could see which one looked the best.

This is a picture of the largest garlic plant.  The bottom 3 leaves were completely dead and the tips of all leaves were dead. 

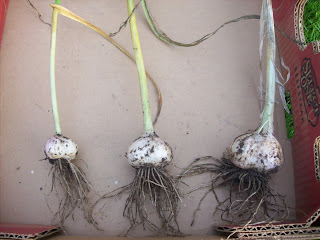
This is another picture of all 3 plants; it starts with the smallest and greenest plant on the left to the largest and most dead plant on the right.  The plant on the far left is almost completely green still and could have used more time to ripen up.

This is the close up of the largest bulb.  As you can see it has started to breakout of its wrapper.  This is detrimental to the storage life of the bulb and means that I left it in the ground too long.  The wrapper has started to deteriorate providing less protection for the bulb.

The bulb in the middle is just about the perfect ripeness from what I have been reading.  It does only have 1 ½ dead leaves but it has a full bulb with outer wrappers starting to dry.  This is going to be the look I want for all of the bulbils that are still in the garden.  I might let some of them wait until the bottom 2 leaves are dead along with a couple leaf tips, but we will see.


The following pictures are closeups of the 3 plants:


These are the shallots that have been drying in the blacksmith shop.  I figured it was time to cut the tops off of them and put them in storage.


Thursday, August 18, 2011

Garden Update

Everything in the garden has been going pretty well except for one row of carrots and the beans that are beside them.  Earlier in the year I was finding beans that had the bottoms broken off of them but I didn’t think much about it.  The other day when I was in the garden I noticed that the row of carrots beside them were looking wilted, they were wilted because some pilled buggers ate the top on the carrots that were above ground!    They only touched the carrots themselves and not the carrot greens. 


After looking at them it appears to have been some little rodent, I'm guessing either mice or voles.  I have seen some around, but there are a number of cats that roam from the nearby farms that will homefully keep what ever population there is of them low.  The good thing is they only touched that one row of carrots, and it was the row that was sort of underneath the beans.  That is something that will be a big focus next year, proper spacing.  The carrots are on the left.

Other than that little mishap I have been harvesting carrots, tomatoes, peppers, cucumbers and zucchini on a daily basis.  The carrots that were grown in the root box beside the she have done terrifically.  They are all perfectly straight and well formed.  The picture below is contanier carrots.

The carrots in the actually garden that were planted earlier are also looking good.  They are significantly larger, but have been in the ground longer.  They are not as straight and the germination rate was lower that the box. The picture below is garden carrots.


My peppers are still looking great! I have let a few ripen to red before eating them and they are definitely sweeter than the yellow ones.  The plants are still blooming and are definitely very prolific producers.


The cherry tomatoes and yellow pear are doing ok.  I am having a problem with some of them splitting as they ripen, but think that that might just be because of the heavy rain we had in the last week.  I have finally been able to pick a few Cherokee purple.  They all have heavy splitting at the stems but are big tomatoes.  I cut into one today and was not disappointed.  It was incredibly juicy, and went very well on the large sandwich I was having.  They plant itself isn’t huge like prior tomato plants and has significantly less foliage, the tomatoes are easy to see but after what's on the vine is picked it doesn’t look like it will continue producing.  I will have to eat some more before I decide if it is a variety I would want to plant again.


Today I also planted some bok choy and kale for the fall. The kale should do well, but I'm not sure how the bok choy will do.  The spring planting was hit pretty hard by the bugs but hopefully these will do better.

I also planted my first cover crop!  The buckwheat I bought in the spring was planted in the bottom bed where the garlic was before.  I barely used any of the seed I had so I will be looking to plant more of it this fall.